
Wanderburg Mods: Damage Stats Setup and BepInEx Controls
- Reviewed
- Scope
- Dated evidence; no installed-build testing
Wanderburg Damage Stats is an unofficial Windows community mod that displays weapon damage information and estimates upgrade choices. Install BepInEx 6 for Unity IL2CPP, place the plugin DLL in the game's BepInEx plugins folder, and launch through Steam. The author targets Wanderburg EA 0.9.8; the mod's 0.7.0 Alpha release number does not establish compatibility with the game's later 0.9.14 patch.
Choose this mod if you want to understand an ordinary run's damage contributions. If your goal is changing health, currencies, movement or cooldowns, those tools belong in the Wanderburg Trainer guide. The mod is also separate from the weapons already built into the game, covered in Module upgrades.
Distinguish community mods from built-in modules
Wanderburg uses modular weapons and structures as part of its normal progression. Installing a community plugin is a different operation: it adds software to the game folder rather than selecting an unlocked weapon during a run. The similar words can send a search for “mods” toward equipment guides that do not answer installation questions.
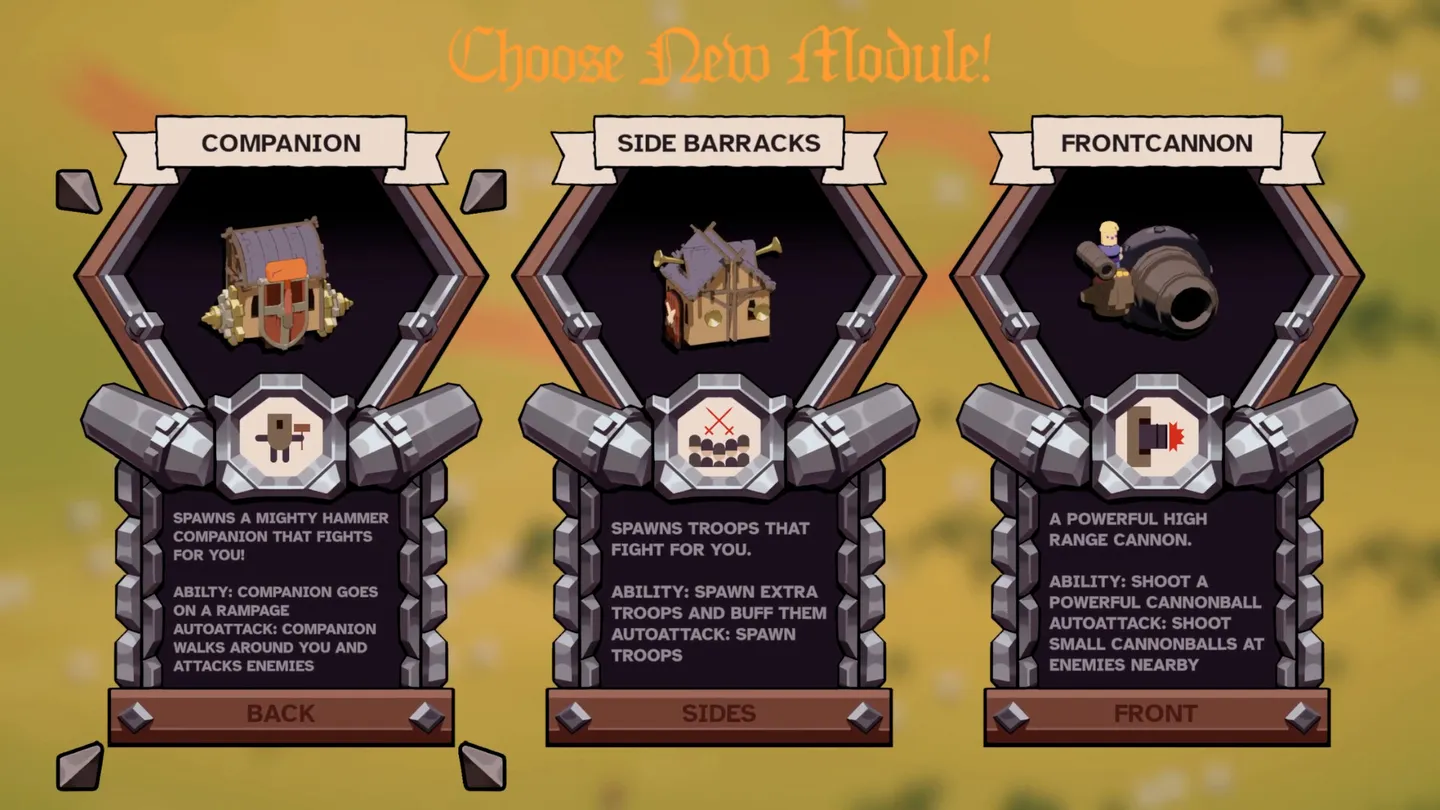
The game's module interface illustrates that distinction. Its equipment choices belong to the normal game. Damage Stats reads information about those weapons and presents an overlay; it does not grant a new cannon, unlock a captain or add a trainer's God Mode switch.
The author describes Damage Stats as a code mod using BepInEx rather than a normal Steam Workshop item. You therefore need the plugin's installation instructions, not a presumed Subscribe button. Treat the author-stated absence of a mod SDK or Workshop integration as the project's installation context, not a promise about every future Wanderburg update.
There are two version numbers to keep separate throughout setup. The game compatibility statement is EA 0.9.8 on Windows. The mod release discussed here is 0.7.0 Alpha. One identifies the game the author worked against; the other identifies the overlay's feature revision. Neither should be silently substituted for the other.
What Damage Stats shows during a run
The mod samples the game's existing damage counters to display damage per second over a rolling twenty-second window and the share contributed by each mounted weapon. It then uses the current run as the starting point for upgrade estimates. This gives you a way to distinguish a weapon that is contributing heavily from one whose damage is barely appearing in the recent sample.
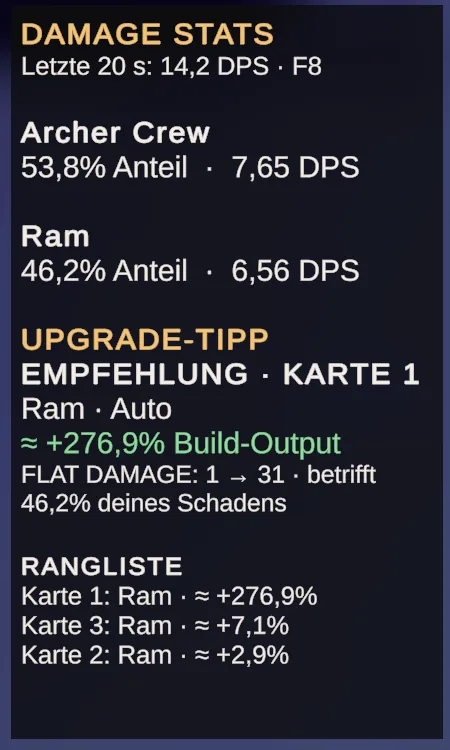
The illustration is an earlier German-language preview of the overlay. It shows total DPS, individual weapon contributions and an upgrade ranking. The numbers belong to that pictured example. They are not a target build, current English interface guarantee or expected damage result on your installation. The 0.7.0 release describes a smaller, more translucent combat HUD and hints positioned closer to upgrade cards.
Read the display as recent behavior. A weapon's damage share reflects damage recorded during the sample window, while the recommendation uses a model of what an offered change could do next. Those are related quantities, but they answer different questions. A measured contribution is information about damage already dealt; a card estimate is a prediction under the model's assumptions.
The author states that the plugin does not alter combat values or save data. It reads counters and observes upgrade and activation information. This makes it an information tool rather than a gameplay-changing trainer, although an unofficial plugin still needs matching installation and version support.
Prepare the correct BepInEx installation
Damage Stats requires BepInEx 6 for Unity IL2CPP on Windows x64. The author specifically warns against choosing the Mono build. BepInEx's IL2CPP installation instructions also distinguish Windows x86 from Windows x64, so pick the variant matching the mod's documented requirement.
The author identifies BepInEx build 6.0.0-be.788+5b766a3 as the build used in their testing. That is an author-tested baseline, not a claim that this guide tested it or that every newer build is interchangeable. The general IL2CPP instructions use Bleeding Edge builds. Follow that installation route rather than substituting a similarly named package for another runtime.
- Open Steam Library, right-click Wanderburg, and choose Manage, then Browse local files. Use the folder Steam opens, including when the game is installed in a separate library.
- Close Wanderburg before copying installation files.
- Select the Windows x64 Unity IL2CPP build required by the mod.
- Extract BepInEx into the game root: the folder containing the game executable.
- Start Wanderburg once through Steam so BepInEx can generate its configuration and supporting folders.
- Close the game before installing the Damage Stats DLL.
The first IL2CPP run can take time while the necessary files are generated. Do not confuse that documented setup stage with an instruction to choose another runtime. Once the generated folders exist, you can install the plugin itself.
If BepInEx is already installed for Wanderburg, the author's quick installation path only requires copying the Damage Stats DLL. Check the existing runtime against the IL2CPP Windows x64 requirement instead of blindly overlaying another installation. This guide does not provide a migration procedure from a different mod loader.
Install or update the Damage Stats plugin
On GitHub, find the author's project lia-xim/WanderburgDamageStats and open its Releases section. Use the packaged WanderburgDamageStats ZIP from that project's release page. BepInEx is installed separately. The automatically generated source-code archives are not the packaged plugin ZIP described by the installation instructions.
- Close Wanderburg.
- Download and extract the release ZIP. Keep its included installation instructions available while setting up.
- Locate the packaged plugin,
WanderburgDamageStats.dll. - Copy that DLL directly into
BepInEx\pluginsinside the actual Wanderburg game folder. - When updating the same plugin, replace its previous DLL in that folder rather than treating the release's source archive as an update package.
- Launch Wanderburg through Steam and start a run to look for the overlay.
The author's example installation path uses C:\Program Files (x86)\Steam\steamapps\common\Wanderburg Game\BepInEx\plugins\. That is an example of a Steam library location, not a required location for every computer. If your library is elsewhere, the relative plugins folder still belongs inside the game directory opened by Steam.
The launch route matters. The author reports that starting Wanderburg's executable directly did not initialize Steamworks correctly in their test and prevented Steam statistics and leaderboard updates for that run. Use Steam for this documented setup; do not turn that individual test into a claim that every direct launch fails on every system.
Use the overlay and recommendation controls
The 0.7.0 Alpha controls separate the combat display from the optional upgrade coach. Hiding an interface is different from uninstalling its plugin.
| Control | Documented function | When to use it |
|---|---|---|
| F7 | Toggle upgrade recommendations | Keep damage information while deciding whether you want coaching |
| F8 | Toggle the whole overlay | Temporarily clear the display during a run |
| F9 on an upgrade screen | Open the detailed comparison | Inspect a hint rather than relying only on its short card label |
| F9 during combat | Show measured skill and auto damage where available | Inspect attack channels supported by the game's counters |
The 0.7.0 HUD stays hidden during starting loadout selection and before the run begins. Absence from that screen is therefore not, by itself, evidence that installation failed. Enter a run before judging whether the combat display is present.
On an upgrade screen, short estimates can appear above or below cards. The release notes say labels remain hidden when they cannot fit; F9 gives access to the detailed comparison. That provides a specific alternative when the small hint is absent without requiring an invented menu switch or a second installation.
The combat channel display depends on the counters the game supplies. If a measured split is unavailable, the mod can report Channel split unavailable. Separate damage-over-time tracking is not implemented in the documented release. Do not read a missing breakdown as proof that a weapon dealt no damage.
Read upgrade estimates without confusing them with measured DPS
The overlay can label unsupported cards Not estimated and incomplete comparisons PARTIAL LEAD. Those labels describe the model's coverage. They do not mean an unestimated card is worthless, nor do they turn the leading modeled option into a guaranteed best overall choice.
The current build's weapon damage shares influence the estimates. If a weapon supplies most of the observed damage, a supported numerical upgrade for that weapon can receive more weight than a similar change to a minor contributor. The model also considers the attributes it can read from the actual offered card rather than assigning every rarity an arbitrary universal bonus.
The author distinguishes measured attack-channel damage from inferred shares used in prediction. Where only a weapon's total damage is available, the model can estimate the split using attack output and observed triggers. That inferred split belongs to the prediction model and may differ from actual hit rates. It should not be described as a measured skill-versus-auto result.
This distinction is especially useful when a recommendation is marked tentative. Timing assumptions, supported attack models and damage-share assumptions can affect the result. Look at the details when the decision depends on one of those assumptions; the overlay's sensitivity comparisons are not guaranteed upper and lower bounds.
Normal numerical upgrades fit the tool's task better than effects it cannot fully model. Area coverage, crowd control, burn refresh, impact speed and some unusual interactions remain outside complete coverage. A card that helps positioning or survival can still be important even when its damage change cannot be estimated. Use the Best Build guide for whole-build execution rather than asking a DPS estimate to replace that decision.
Understand the future-upgrade planner
The planner compares supported current choices against sampled paths through later normal upgrades. Its default horizon is five future upgrade decisions, with up to sixty-four simulated paths per current card. The documented FutureUpgrades configuration accepts values from one to eight.
A longer lookahead does not reveal the actual future offers. The planner samples possibilities from the current module upgrade pool and follows supported upgrade chains. It uses its own random generator rather than rerolling the game's cards or reading a guaranteed sequence of later choices.
The percentage shown below a planned pick describes how often that card led the sampled comparisons. It is not your probability of winning the run. Likewise, the model's path score is a modeled damage comparison, not a promised final damage total.
Future new modules, artifacts, special or legendary effects, survival needs and changes in playstyle are outside this lookahead. Unsupported draws are marked as excluded rather than replaced with more favorable cards. If important parts of the current choice remain unestimated, an apparently strong planned pick still needs that qualification.
Search work is spread across frames and results update as balanced batches finish. That explains why a planner result may develop rather than appearing as an instant view of the game's future. The tool is helping compare modeled possibilities, not forecasting an entire run.
Check a missing display at the plugin boundary
Start with checks that relate directly to this installation. Confirm the DLL is directly inside the game's plugins folder, that the installed package matches the intended mod release, and that you launched through Steam. Then begin a run and use F8 to check whether the overlay was simply hidden.
The mod's documentation names BepInEx\LogOutput.log and suggests searching for Wanderburg Damage Stats. BepInEx's general IL2CPP instructions instead name an initial LogOutput.txt file. Inspect the log actually created by your installation; the difference in documented names is not evidence that a log must be missing.
The mod stores settings in BepInEx\config\io.github.lia-xim.wanderburg-damage-stats.cfg, including overlay position and scale. Use those documented settings when the display loads but its placement is inconvenient. Do not guess additional configuration names or treat the mod configuration as the game's graphics settings.
A failure to load after a game update may involve changed internal functions or text. Report the game version, mod release, BepInEx build and relevant log message together. If the base game itself fails to launch, use the separate Crash troubleshooting guide; reinstalling an information overlay is not a substitute for diagnosing that problem.
Hide, disable or remove the plugin
Choose the action that matches the result you want. F8 only hides the overlay. It leaves the plugin installed and does not mean BepInEx or its configuration has been removed.
To disable the plugin, close the game and use the release package's documented Disable-Mod.ps1 script. The corresponding Enable-Mod.ps1 script turns it back on later. Use these only from the identified author's package, and follow its instructions rather than inventing a script invocation or changing system security settings.
To remove the plugin, close Wanderburg and delete only BepInEx\plugins\WanderburgDamageStats.dll. That documented removal action concerns this plugin. It is not an instruction to delete the complete game directory or every plugin sharing the loader.
After another Early Access update, check the author's compatibility statement before reinstalling. Keep the game patch, the plugin release and the loader build separate in your notes. That makes a later support request precise without assuming that a successful installation on an older game patch proves support for the newer one.